FreeX WiFi Thermal Printer FAQ - After Sales
If you have any questions Pre-Sales please visit to Pre- Sales FAQ Page
After-Sales FAQ
Q1. What to do if you encounter any unexpected issue at anytime?
please simply factory reset the FreeX.
- Power on
- Open the lid
- Press the "Feed" button for a FULL 20 seconds while the lid is OPEN
- Restart FreeX and it shows in solid green light
In rare case, if the factory reset and other solutions on this guide don't resolve the issue, you may need to reach out to our customer support, please provide the following:
- Pictures/videos of problem demonstration
- Picture of printer self-test page: turn off the printer, press and hold the "Feed" button and turn on the printer
- Your OS info and connection type (USB or WiFi)
Q2. What to do if the red/yellow light keeps flashing after a completed factory reset action above?
please follow these simple steps.


Possible reason 1: It is likely that the printer head and label roller has gotten dirty.
- Please turn FreeX printer off and allow it to cool down
- Use any 70% Isopropyl Alcohol pad to wipe printer head. These are commonly available in pharmacies and grocery stores. (If you don't have an alcohol pad, you may use slightly wet paper)
- Allow 2-3 minutes for the components to dry, then turn FreeX back on.
- Open the lid of your printer
- Apply equal pressure to both sides of the printer head located at the top of the printer opposite the roller and push inward
- Wipe any dust or adhesive that may have gotten stuck to it
Q4. Why won't my FreeX thermal printer connect wirelessly?
- When setting up the WIFI, did you make sure the SSID and password were correct and case sensitive?

- At the end of the completed WiFi configuration, a label of three lines of information (rather than the label of four lines as above) should be automatically printed out (as shown below). Usually the locally configured IP is different than the factory default 192.168.1.87.

- If you didn't get the three-liner label, it means the WiFi configuration is incomplete, please follow all details on step 2 of our quick start guide.
- Make sure there's a clear path between your router and printer for strong signal.
Q5. How to print out a label in correct size?
- Make sure your printer has labels loaded
- Pull up your label on your computer

- Click "File" and "Print"

- For "Printer" select FreeX however you have it saved in this case FreeX_Wireless

- For "Paper Size" select 4x6 or 100x150mm

- Then click "Print"
- The label should print out immediately when connected with USB and within 15 seconds when printing wireless
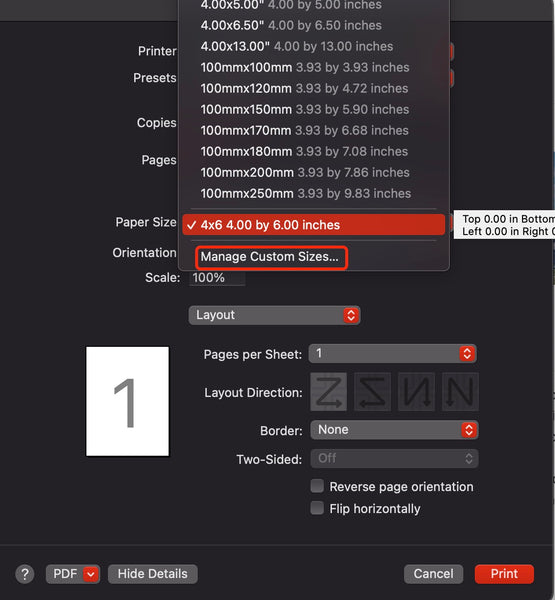
Q6 If you see unrecognizable om/oe paper size on Chrome browser on MacOS, how to create a custom 4x6 label?

Method 1: Choose paper size om w283h425
Method 2: Click on more settings and select "print using system dialog"

Step 2: Select paper size

Step 3: Select manage custom size
Q7. How to crop the 4x6 label from paper of other sizes
- Download Adobe Acrobat and follow the steps in the pictures
If you're using the latest version of Adobe Acrobat, follow steps below:
Select "Take a snapshot" from the menu.

Drag the area you want to print:

Click "Print" and preview the print area and size are correct:

If you're using a legacy version of Adobe Acrobat, follow steps below


Q8. How to print in more contrast?
For better printing contrast on Windows, please follow this video starting from 18:56.
Q9. How to refill labels?
Option 1: Labels in rolls
- Press the two gray knobs on each side of the printer towards you and the lid will open. Lift it up.
- Inside you will see gray SuperRoll label holder
- On the left side of the label holder there is a switch, press it down
- The label holder will spring together
- Grab your label roll and make sure the sticky part is right side up, then fit the roll between the label holder and make sure it it aligned properly with the holes
- Grab the first label and put it underneath the two gray pieces. This aligns the label properly and holds them in place as they come out
- Close the lid
- An empty label will come out, this is to align the next label perfectly
- Now you are ready to print
Option 2: For fanfold stack labels
- Place your folded labels behind your printer
- Now open the lid by pushing the two gray knobs on each side of the printer towards you
- Make sure the label holder is in place, by checking that the switch on the left of the label holder is pushed up
- Now feed the first label through the slit on the back of the printer
- Make sure the label is underneath the two gray pieces at the front.
This aligns the label properly and holds them inn place as they come out - Close the lid
- An empty label will come out, this is to align the next label perfectly
- Now you are ready to print
Q10. Why does a label come out every time you turn on the printer?
When you turn the printer off and on, an empty label will come out because the printer finds the beginning of a new label so it is ready to go and print. We recommend keeping the printer on so no label are wasted.
It will not only avoid waste a label, but also significantly reduce the chance of disconnecting from your WiFi router. We understood that you may be concerned about the power consumption, we developed our printer with only 0.5 wattage standby power consumption.
Try restarting your printer. Turn the printer off and on and try connecting again.
Q11. Why did the label come out blank?
There are a few reasons for this:
- A blank label comes out when you reload the printer with new labels
- Your labels could be loaded upside down
- You may be using the wrong labels, make sure they are direct thermal labels
Q12. Why isn't my label completely printed? Why is it cut off?
You need to make sure you set the right paper size when printing your label. It should be 4x6 or 100x150mm.
Q13. Why do my labels print unevenly?
- Open the lid of your printer
- Apply equal pressure to both sides of the printer head located at the top of the printer opposite the roller and push inward
- Wipe any dust or adhesive that may have gotten stuck to it
Q14. Why does the printer keep beeping?
- The printer will keep beeping when the lid is open
- The printer will keep beeping when the label holder is empty
Q15. What to do if FreeX couldn't auto calibrate the feeding? How to reset the feeding?
Try holding down the feed button for 5-10 seconds and see if it will calibrate for you.
Q16. How to update the printer firmware?
1. Open the Toolbox software, click "Download" on the bottom right.

2. Click on "Select Firmware" to choose the correct firmware.
*Please note that different batch of FreeX printers have different firmware versions.
If your printer Serial Number (can be found on the bottom of printer) is between:
- FWS210160001-FWS210162400, or FWS220160001- FWS22016108, please download your firmware here.
- FWS220960001-FWS220960504, or FWS230410001 and beyond, please download your firmware here.

3. Once the firmware is selected, click on "Update".
*To prevent your printer becomes a brick, please make sure to wait for a FULL MINUTE while updating before restarting.

Q17. What to do if the printer's WiFi disconnects frequently and you have to repeat the printer setup?
The cause of this issue is that other devices are occupying the same IP address from your router. To solve this problem, we suggest manually assigning a fixed IP to your FreeX WiFi printer.
1. Find correct IP address of your router.
Please follow this link to check your router's IP address.
Your goal is to locate the Sub Mask IP address and Gateway IP address of your router like below.

The screenshot above is only for demonstration purpose, your router may have different Subnet Mask and Gateway IP address. Please follow this link to check your router's IP address.
2. Connect your FreeX WiFi printer via USB connection.
3. Open the FreeX WiFi Thermal Printer Tool software
4. Open FreeX Setup and go to the Ethernet tab

4.1 Select IP circle.
4.2 Input the Sub Mask IP address you located in step 1.
4.3 Input the Gateway IP address you located in step 1.
4.4 Manually assign an IP address to your FreeX WiFi printer. (Detailed instructions below)
Please note that
- The first three numbers of the manually assigned IP address should be identical to the first three numbers of the Gateway IP address.
- The fourth number is assigned by your own discretion, the valid range is 1-255. To better avoid the future conflicts from another device, we suggest you pick any number between 210 and 230.
- For example: if your router's Gateway IP address is 192.168.3.1, you may assign your printer IP to 192.168.3.222
4.5 Click Set button to assign it to your router. Wait a minute to get a confirmation label. If you didn't get a confirmation, please assign a different IP address.
4.6 When you add your FreeX printer, use the manually assigned IP.
Q18. What to do if it prints gibberish characters for test page?
1. Open the Toolbox software, click "Download" on the bottom right.
2. Click on "Character Library" to update it .
*Please note that different batch of FreeX printers have different firmware versions.
If your printer Serial Number (can be found on the bottom of printer) is between:
- FWS210160001-FWS210162400, or FWS220160001- FWS22016108, please download your firmware here.
- FWS220960001-FWS220960504, or FWS230410001 and beyond, please download your firmware here.

3. Once the firmware is selected, click on "Update".
*To prevent your printer becomes a brick, please make sure to wait for a FULL MINUTE while updating before restarting.
Further Questions?
If you have any further questions, please send emails to cs@getfreex.com!
When sending email please provide the following:
- Pictures/videos of problem demonstration
- Picture of printer self-test page: turn off the printer, press and hold the "FEED" button and turn on the printer
- Your OS info and connection type (USB or WiFi)