First Draft
For MacOS,
Step 1: Print via USB and Configure WiFi of FreeX Printer
1.1: Download
Click here to download the latest driver and WiFi Toolbox software.
1.2: Install the FreeX Driver
- Once downloaded, go in your downloads folder, and unzip the Driver and Toolbox Software you just downloaded

- Click on FreeX Driver and Install it

1.3: Power on and Connect via USB Port
- Plug in the printer to a power source with the power cable
- Plug in the printer to your computer with the USB cable
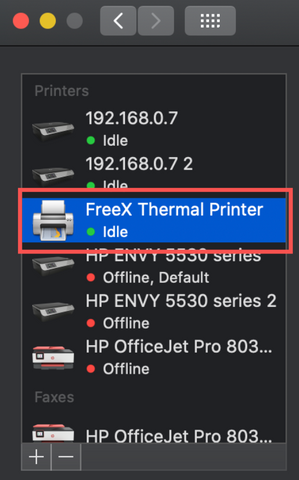
- On MacOS, go to "System Preferences" and click on "Printers and Scanners"

- Make sure FreeX Thermal Printer appears on the list of printers and you are ready to go
1.4: Configure WiFi
- Open FreeX WiFi ToolBox

- Click on "Connection Test" and it should say "Connection Successful"

- Then click "FreeX Setup" and another window will open

- You will be in the "WiFi" tab

- In the "SSID (2.4GHz)" type in your WiFi name, make sure to be very careful since this is case sensitive, the 2.4GHz is referring to the WiFi strength the FreeX is compatible with

- "WPA-PSK/Wha2-PSK" should be marked, for type "WPA2-PSK" should be marked and for encryption "AES" should be marked as well, double check these are all correct, then in "PSK Key" type in your WiFi password (case sensitive)

- Then click "Set," and it should say "Sync Success," and a label with the WiFi Configuration information will come out. Here you will also get more information about what you just completed and where to go next.

- Double check that the WiFi name and WiFi password are correct on the piece of paper

- Then click the "Ethernet" tab

- Make sure "DHCP" is picked and for "DHCP" make sure it says "Enable," these should be set like this already. Then press "Set" and "Set Success" should appear on the screen, if the it says "Set Failed" restart your printer and start the process from the beginning


- Turn the printer off and on, then the printer will beep. Within a minute a label should print out with the WiFi connection details, the printer is now connected to your WiFi. The information on the label gives you the IP address that will be used shorty

Step 2: Connect the printer to your macbook wirelessly
- On MacOS, go to "System Preferences," and click "Printers and Scanners"

- Click "+" to add a new printer

- A new window will pop up, at the top of it click "IP"

- Then in the "Address" type in the IP address from the printed piece of paper you got

- Make sure in "Protocol," "HP Jetdirect- Socket" is selected

- For the "Name" pick whatever you would like for example FreeX_Wireless

- For "Use" pick "Select Software" and pick "FreeX Thermal Printer"


- Click "Add" and now the printer is added and you are ready to print wirelessly
FAQ
1. How to print out a label?
- Make sure your printer has labels loaded
- Pull up your label on your computer

- Click "File" and "Print"

- For "Printer" select FreeX however you have it saved in this case FreeX_Wireless

- For "Paper Size" select 4x6 or 100x150mm

- Then click "Print"
- The label should print out immediately when connected with USB and within 15 seconds when printing wireless
2. How to refill labels? Add product pictures here
Option 1: Labels in rolls
- Press the two gray knobs on each side of the printer towards you and the lid will open. Lift it up.
- Inside you will see gray SuperRoll label holder
- On the left side of the label holder there is a switch, press it down
- The label holder will spring together
- Grab your label roll and make sure the sticky part is right side up, then fit the roll between the label holder and make sure it it aligned properly with the holes
- Grab the first label and put it underneath the two gray pieces. This aligns the label properly and holds them in place as they come out
- Close the lid
- An empty label will come out, this is to align the next label perfectly
- Now you are ready to print
Option 2: For folded labels
3. How to crop the 4x6 label from paper of other sizes
https://get.adobe.com/reader
4. What types of labels is FreeX compatible with?
FreeX is non proprietary, meaning any direct thermal labels are compatible, this saves money and is more convenient. FreeX will automatically recognize, feed, and adjust to several label sizes ranging from 0.78 to 4.1 inches (20 to 104mm) in width. We do offer our FreeX very own FreeX SuperRoll labels to maximize both label capacity and customer savings.
5. Does the FreeX print anything else besides labels? (stickers?)
6. Why does a label come out every time you turn on the printer?
When you turn the printer off and on, an empty label will come out because the printer finds the beginning of a new label so it is ready to go and print. We recommend keeping the printer on so no label are wasted.
7. What is thermal printing? Why no ink?
Thermal printing is a digital printing process that makes images by heating coated thermal paper. The coating turns black in the areas where it is heated, which produces the image. Thermal printing requires no ink or toner thus saving money in the long run.
8. What is the SuperRoll feature?
The SuperRoll makes the FreeX more compact than other thermal printers. It is sized at 7.87x6.84x7.05 inches and it fits 600 labels.
9. How to set up FreeX with Amazon? Shopify? Ebay? Paypal?
10. How to set up with Windows?
11. Why isn't FreeX connecting? Why isn't it working?
Try restarting your printer. Turn the printer off and on and try connecting again.
12. Why did the label come out blank?
There are a few reasons for this:
- A blank label comes out when you reload the printer with new labels
- Your labels could be loaded upside down
- You may be using the wrong labels, make sure they are direct thermal labels
13. Why isn't my label completely printed? Why is it cut off?
You need to make sure you set the right paper size when printing your label. It should be 4x6 or 100x150mm.
14. Why does the printer keep beeping?
- The printer will keep beeping when the lid is open
- The printer will keep beeping when the label holder is empty
15. Why aren't the labels sharp?