FreeX WiFi Thermal Printer - How to Configure to Your Local WiFi Network on MacOS?
This guide is ONLY for the FreeX WiFi model, NOT for the newer FreeX WiFiMAX model.
For MacOS,
1: Preparation
Make sure you can print via USB (quick guide here).
- Open FreeX WiFi ToolBox
- In rare case, if the popup message shows “You do not have permission to open the application”
- Using Terminal, enter the "sudo chmod -R 755 " and then drag the app file onto the Terminal window, press enter, and enter your password if asked. Detailed reference

- Click on "Connection Test" and it should say "Connection Successful" if it says "Failed", reconnect the USB port, restart your printer, and reopen the WiFi Toolbox

- Then click "FreeX Setup" and another window will open

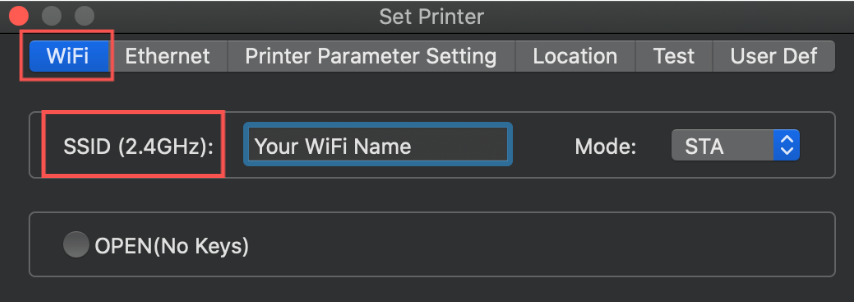
- You will be in the "WiFi" tab

- In the "SSID (2.4GHz)" type in your WiFi name, make sure to be very careful since this is case sensitive, the 2.4GHz is referring to the WiFi frequency the FreeX is compatible with
- "WPA-PSK/Wha2-PSK" should be marked, for type "WPA2-PSK" should be marked and for encryption "AES" should be marked as well, double check these are all correct, then in "PSK Key" type in your WiFi password (Case sensitive)

- Then click "Set," and it should say "Sync Success," and a label with the WiFi Configuration information will come out. Here you will also get more information about what you just completed and where to go next.

- Double check that the WiFi name and WiFi password are correct on the piece of paper

- Then click the "Ethernet" tab

- Make sure "DHCP" is picked and for "DHCP" make sure it says "Enable," these should be set like this already. Then press "Set" and "Set Success" should appear on the screen, if the it says "Set Failed" restart your printer and start the process from the beginning


- Turn the printer off and on, then the printer will beep. Within a minute a label should print out with the WiFi connection details, the printer is now connected to your WiFi. The information on the label gives you the IP address that will be used shorty.

OPTIONAL STEP
What to do if the printer's WiFi disconnects frequently and you have to repeat the printer setup?
You can set a static IP of your FreeX printer:
The cause of this issue is that other devices are occupying the same IP address from your router. To solve this problem, we suggest manually assigning a fixed IP to your FreeX WiFi printer.
1. Find correct IP address of your router.
Please follow this link to check your router's IP address.
Your goal is to locate the Sub Mask IP address and Gateway IP address of your router like below.

The screenshot above is only for demonstration purpose, your router may have different Subnet Mask and Gateway IP address. Please follow this link to check your router's IP address.
2. Connect your FreeX WiFi printer via USB connection.
3. Open the FreeX WiFi Thermal Printer Tool software
4. Open FreeX Setup and go to the Ethernet tab

4.1 Select IP circle.
4.2 Input the Sub Mask IP address you located in step 1.
4.3 Input the Gateway IP address you located in step 1.
4.4 Manually assign an IP address to your FreeX WiFi printer. (Detailed instructions below)
Please note that
- The first three numbers of the manually assigned IP address should be identical to the first three numbers of the Gateway IP address.
- The fourth number is assigned by your own discretion, the valid range is 1-255. To better avoid the future conflicts from another device, we suggest you pick any number between 210 and 230.
- For example: if your router's Gateway IP address is 192.168.3.1, you may assign your printer IP to 192.168.3.222
4.5 Click Set button to assign it to your router. Wait a minute to get a confirmation label. If you didn't get a confirmation, please assign a different IP address.
4.6 When you add your FreeX printer, use the manually assigned IP.
Final Next Step: Connect Your Computer to a WiFi-Configured FreeX Printer Wirelessly
If you connect from MacOS, please follow this quick guide.
If you connect from Windows, please follow this quick guide.